💡 When it comes to data fetching in React, I have always preferred to use a third-party library to manage data fetching, since there are many aspects that one needs to take care of when dealing with it: caching, performance, memory management and many more.
There are plenty of options to choose from, each one having its advantages/disadvantages (I’m going to list a few):
- react-query
- SWR
- Apollo
- RTK-query
I’ve mostly worked with react-query, and lately started to use Apollo for GraphQL. In this article, we’re going to focus on react-query, the advantages it provides, and how to use it to fetch data on the client/server in a Next.js project.
Table of contents
Fundamentals
Axios and React Query
What about Axios? As mentioned in the article’s title, it goes hand in hand with react-query. Briefly, it is a library for making HTTP requests. It allows you to send network requests to retrieve or update data on a remote server. It can be used in any JavaScript/TypeScript environment, not just React.
React-query complements it, by handling all the other concerns of the developer. They are listed in its documentation:
• Caching… (possibly the hardest thing to do in programming)
• Deduping multiple requests for the same data into a single request
• Updating “out of date” data in the background
• Knowing when data is “out of date”
• Reflecting updates to data as quickly as possible
• Performance optimizations like pagination and lazy loading data
• Managing memory and garbage collection of server state
• Memoizing query results with structural sharing
Next.js
Next.js already provides built-in support for routing, media files, server-side rendering etc. However, for data fetching, it lets the developer choose the preferred data fetching solution.
I chose to use Next.js for this article since it has server-side rendering capabilities. Configuring react-query for SSR is a bit more difficult than for CSR, which is essentially the same as in a plain React app.
Tutorial
Getting started
Create a new Next.js application using the following command:
npx create-next-app@latestThe full details of this setup can be found on their Getting Started docs. Once the application was created, navigate to its root directory and run the following command to start the development server:
npm run devOpen the http://localhost:3000 address in the preferred web browser, the default Next.js page should be there.

create-next-appCreating the API
For this article, we’re going to use a simple API that we’ll build ourselves using the Next’s API feature. Open the hello.js file, which is under the /pages/api/ directory, and paste the following:
const movies = [
  {
      "id": 1,
      "title": "Heat",
      "year": "1995",
      "runtime": "170",
      "genres": [
          "Action",
          "Crime",
          "Drama"
      ],
      "director": "Michael Mann",
  },
  {
      "id": 2,
      "title": "L.A. Confidential",
      "year": "1997",
      "runtime": "138",
      "genres": [
          "Crime",
          "Drama",
          "Mystery"
      ],
      "director": "Curtis Hanson",
  },
  {
    "id": 3,
      "title": "Blood Diamond",
      "year": "2006",
      "runtime": "143",
      "genres": [
          "Adventure",
          "Drama",
          "Thriller"
      ],
      "director": "Edward Zwick",
  },
];

export default function handler(req, res) {
  res.status(200).json(movies);
}
That is, we’re going to create an internal movies API.
Installing and configuring axios
1. To install axios, run the following command:
npm i axios2. Next, create an environment file named .env.local, under the src directory. It will contain an environment variable representing the API route:
NEXT_PUBLIC_API_BASE_URL=http://localhost:3000/apiFor more details regarding environment variables in Next.js, check their official guide.
3. We will now add the axios configuration file in the directory src/request/config, called axios.js:
import axios from "axios";

const instance = axios.create({
    baseURL: process.env.NEXT_PUBLIC_API_BASE_URL
});

export default instance;
We have created the default axios instance, which we’re going to use in conjunction with react-query.
Demo
With axios configured, we can now use it to fetch data from the API we’ve created earlier:
import React from "react";
import { Inter } from "next/font/google";
import axios from "../request/config/axios";

const inter = Inter({ subsets: ["latin"] });

export default function Home() {
  const [data, setData] = React.useState([]);

  React.useEffect(() => {
    axios.get("/hello").then((response) => {
      if (response.data) {
        setData(response.data);
      }
    });
  }, []);

  return (
    <>
      <h1>Movies List</h1>
      {JSON.stringify(data)}
    </>
  );
}
The API response should be displayed in plain text:

Great! Now that axios has been properly configured, it’s time to move on to react-query.
Installing and configuring react-query
1. Install react-query
npm i react-query2. Creating the queryClient.
Since the library uses the Context API to provide the queryClient instance, which is used by all of the hooks it exposes, we’re going to configure it and provide it to the application. Thus, create a new file at the same level as the earlier axios.js, named queryClient.js, and add the following:
import { QueryClient } from "react-query";
import axiosInstance from "./axios";

const pathSeparator = "/";

const queryClient = new QueryClient({
  defaultOptions: {
    queries: {
      queryFn: ({ queryKey }) =>
        axiosInstance
          .get(queryKey.join(pathSeparator))
          .then(({ data }) => data),
    },
  },
});

export default queryClient;
This way, we’re configuring react-query to always use axios when making queries. Since the queryKey parameter is an array, we’re joining all of its elements to create the final URL.
3. Making it available for any component. To do this, we’re going to use the react-query’s QueryClientProvider:
import "@/styles/globals.css";
import { QueryClientProvider } from "react-query";
import queryClient from "../request/config/queryClient";

export default function App({ Component, pageProps }) {
  return (
    <QueryClientProvider client={queryClient}>
      <Component {...pageProps} />
    </QueryClientProvider>
  );
}
4. Use the useQuery hook in the main page:
import React from "react";
import { useQuery } from "react-query";

export default function Home() {
  const { data, isLoading } = useQuery(["/hello"]);

  return isLoading ? (
    <p>Data is fetching ...</p>
  ) : (
    <>
      <h1>Movies List</h1>
      {JSON.stringify(data)}
    </>
  );
}
We’ll get the same output as before:

Congratulations! We have just successfully configured react-query, axios to be used alongside Next.js.
Configuring react-query for SSR through hydration
Since Next is about server-side rendering, we’re going to configure react-query to be used in a SSR context. Until now, the request and request data rendering were happening on the client.
In order to configure react-query for SSR, we’re going to build on the example we’ve already completed. For this matter, we’re going to slightly modify the queryClient that is passed. The queryClient should be recreated on any new request, in order to ensure data is not shared across multiple requests. Thus, extract the query client’s configuration in a separate object.
import axiosInstance from "./axios";

const pathSeparator = "/";

const queryClientConfiguration = {
  defaultOptions: {
    queries: {
      queryFn: ({ queryKey }) =>
        axiosInstance
          .get(queryKey.join(pathSeparator))
          .then(({ data }) => data),
    },
  },
};

export default queryClientConfiguration;
Provide it to the query client.
import React from "react";
import "@/styles/globals.css";
import queryClientConfiguration from "@/request/config/queryClient";
import { QueryClient, QueryClientProvider } from "@tanstack/react-query";

export default function App({ Component, pageProps }) {
  const [queryClient] = React.useState(
    () => new QueryClient(queryClientConfiguration)
  );

  return (
    <QueryClientProvider client={queryClient}>
        <Component {...pageProps} />
    </QueryClientProvider>
  );
}
Hydrate the rendered component with the dehydrated state. If you’re looking to learn more about hydration, check the following blog post.
import React from "react";
import "@/styles/globals.css";
import queryClientConfiguration from "@/request/config/queryClient";
import {
  Hydrate,
  QueryClient,
  QueryClientProvider,
} from "@tanstack/react-query";

export default function App({ Component, pageProps }) {
  const [queryClient] = React.useState(
    () => new QueryClient(queryClientConfiguration)
  );

  return (
    <QueryClientProvider client={queryClient}>
      <Hydrate state={pageProps.dehydratedState}>
        <Component {...pageProps} />
      </Hydrate>
    </QueryClientProvider>
  );
}
In the page component, we have to prefetch the query on the server and serialize it. For more information regarding getServerSideProps in Next, check their official documentation.
import React from "react";
import axiosInstance from "../request/config/axios";
import { dehydrate, QueryClient, useQuery } from "@tanstack/react-query";

const getMovies = () => axiosInstance.get("/hello").then(({ data }) => data);
const moviesQueryKey = ["movies"];

export default function Home() {
  const { data } = useQuery(moviesQueryKey, getMovies);

  return (
    <>
      <h1>Movies List</h1>
      {data.map(({ id, title }) => (
        <h2 key={id}>{title}</h2>
      ))}
    </>
  );
}

export async function getServerSideProps() {
  const queryClient = new QueryClient();

  await queryClient.prefetchQuery(moviesQueryKey, getMovies);

  return {
    props: {
      dehydratedState: dehydrate(queryClient),
    },
  };
}
Now, the useQuery hook will read from the data that has been dehydrated on the server.
I chose to render the movies’ titles in h2 tags in order to properly check if the page has successfully been server-rendered.

On Chrome, right click on the page and go to “View Page Source”. We will be able to see the h2 tags rendered on the server.
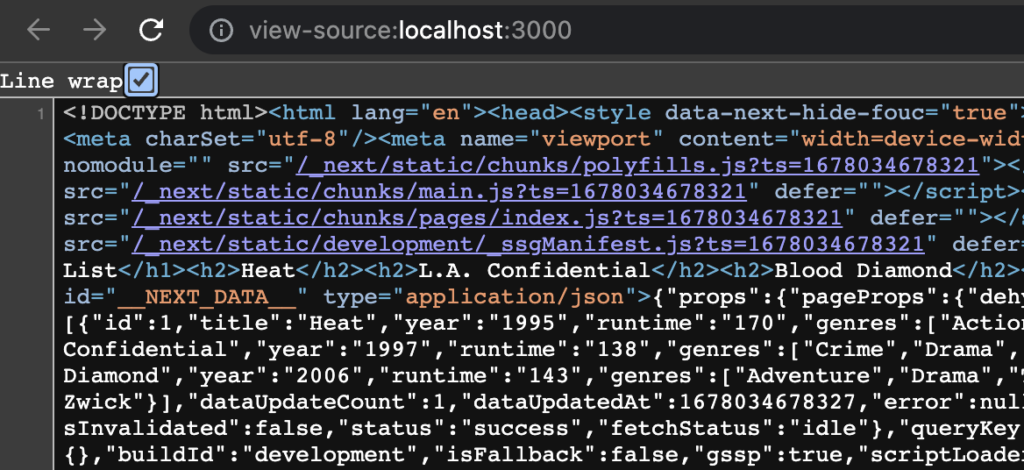
Server-side rendering the content is highly recommended when the webpage’s SEO is important.
As usual, here is the link to the repository: https://github.com/ISilviu/data-fetching-next
References
- https://tanstack.com/query/latest/docs/react/overview
- https://tanstack.com/query/v4/docs/react/guides/ssr
- https://nextjs.org/docs/getting-started
- https://nextjs.org/learn/basics/api-routes/creating-api-routes
- https://www.toptal.com/front-end/client-side-vs-server-side-pre-rendering
- https://www.botify.com/blog/client-side-server-side-rendering-seo
Leave a Reply